How do you screenshot a PC? The Definitive Manual for Every User
The first time you needed to share a glitch, highlight a design flaw, or preserve a fleeting moment on-screen, you faced a fundamental question: how do you screenshot a PC? The answer isn’t just about pressing a button—it’s about understanding the layers of functionality embedded in your operating system, from the simplest keyboard combinations to the most granular customization options. Whether you’re troubleshooting software, documenting an error, or simply archiving a meme, the method you choose can dictate speed, quality, and even professionalism.
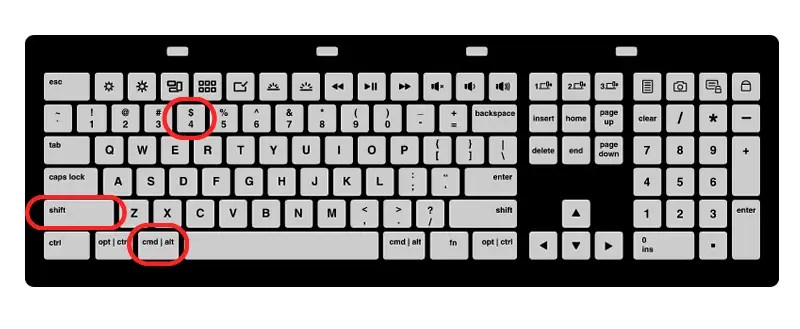
Modern PCs offer more ways to capture screenshots than ever before, yet many users remain unaware of the full spectrum of tools at their disposal. The default shortcuts—like `PrtScn` or `Cmd+Shift+4`—are just the beginning. Behind these commands lies a history of evolving technology, from the clunky early methods of manual screen tracing to today’s AI-enhanced annotation tools. The evolution reflects broader trends in digital workflows: efficiency, accessibility, and integration with cloud services. But before diving into the latest features, it’s worth pausing to recognize how far we’ve come.
For professionals, the stakes are higher. A misconfigured screenshot can obscure critical details in a report, while a poorly timed capture might miss the exact moment of a bug. Developers, designers, and support technicians rely on precise, repeatable methods to ensure consistency. Meanwhile, casual users often overlook the fact that their PC’s screenshot tools can do far more than save an image—they can edit, annotate, and even share directly. The gap between what most people know and what’s possible is where productivity gains—and frustrations—lie.

The Complete Overview of How Do You Screenshot a PC
The process of capturing a PC screen has standardized into three primary categories: native OS tools, third-party applications, and hardware-specific solutions. Native methods—such as Windows’ `Snipping Tool` or macOS’s `Cmd+Shift+4`—are deeply integrated into the system, offering seamless performance with minimal setup. These tools have undergone significant refinement; for instance, Windows 11’s updated Snipping Tool now includes delay timers and sketching capabilities, while macOS’s built-in screenshot utility supports drag-to-select regions with pixel-perfect accuracy. Third-party tools, like Snagit or Greenshot, extend functionality with advanced features such as scrolling window captures, multi-monitor support, and cloud integration, though they often require installation and may introduce compatibility quirks.Beyond software, hardware solutions—such as dedicated screenshot buttons on keyboards or external capture devices—cater to niche use cases, particularly in gaming or professional streaming. These methods prioritize speed and reliability but lack the flexibility of software-based alternatives. The choice between these approaches often hinges on the user’s workflow: casual users may prefer native shortcuts, while power users might invest in specialized software for complex projects. Understanding the trade-offs—such as file format compatibility, annotation options, or system resource impact—is key to selecting the right method for how do you screenshot a PC in any given scenario.
Historical Background and Evolution
The concept of capturing a computer screen emerged in the 1980s, when early graphical user interfaces (GUIs) like Apple’s Macintosh and Microsoft’s Windows required users to manually trace images from monitors onto paper—a tedious process that limited widespread adoption. The first digital screenshot tools appeared in the late 1980s with software like Macintosh’s "Grab" utility (1988) and Windows 3.0’s "Print Screen" command (1990), which allowed users to copy the entire display to the clipboard. These tools were rudimentary by today’s standards, offering no selection options and saving images in low-resolution formats like BMP. The real breakthrough came with Windows 95, which introduced the `PrtScn` key as a universal shortcut, though it still required pasting into paint software to save.The turn of the millennium brought significant advancements. Windows XP’s Snipping Tool (2004) introduced region-based captures and basic annotations, while macOS’s `Cmd+Shift+4` (2007) streamlined the process with drag-to-select functionality. The rise of smartphones and cloud services in the 2010s further influenced PC screenshot tools, leading to features like one-click sharing and AI-powered editing. Today, modern OS updates continue to refine these tools, with Windows 11’s Snipping Tool now supporting delayed captures and sketching tools, mirroring the convenience of mobile devices. This evolution reflects a broader shift toward user-centric design, where screenshot functionality is no longer an afterthought but a core part of digital productivity.
Core Mechanisms: How It Works
At its core, capturing a screenshot involves three technical steps: framebuffer access, image processing, and output handling. The framebuffer is a section of memory where the operating system stores the graphical data displayed on the screen. When a screenshot command is triggered, the OS reads this data and converts it into a digital image format (e.g., PNG, JPEG, or GIF). Native tools like Windows’ `Snipping Tool` or macOS’s `screencapture` command handle this internally, while third-party software may offer additional layers, such as real-time compression or multi-monitor stitching.Table of Contents
- The Complete Overview of How Do You Screenshot a PC
- Historical Background and Evolution
- Core Mechanisms: How It Works
- Key Benefits and Crucial Impact
- Major Advantages
- Comparative Analysis
- Future Trends and Innovations
- Conclusion
- Comprehensive FAQs
- Q: Why doesn’t the `PrtScn` key work on my Windows PC?
- Q: Can I screenshot a specific window without capturing the entire screen?
- Q: How do I screenshot on a PC without a `PrtScn` key?
- Q: Are there screenshot tools that capture scrolling webpages?
- Q: How can I edit a screenshot after taking it?
- Q: Can I set up custom hotkeys for screenshots?
- Q: Why does my screenshot look blurry or pixelated?
- Q: How do I screenshot a game without alt-tabbing out?
- Q: Can I automate screenshots on a schedule?
- Q: Are there screenshot tools that work across multiple monitors?
- Q: How do I screenshot a password field without showing the text?
The method of triggering the capture varies by OS and tool. On Windows, the `PrtScn` key copies the entire screen to the clipboard, while `Win+Shift+S` opens a floating toolbar for region selection. macOS’s `Cmd+Shift+4` activates a crosshair cursor for precise captures, and `Cmd+Shift+5` introduces an overlay with options for window, full-screen, or timed captures. Under the hood, these commands interact with the Windows Graphics Component (WGC) or macOS’s Quartz Core framework, which manage rendering and memory allocation. Some advanced tools, like OBS Studio, use DirectX/OpenGL APIs to capture high-performance screenshots from games or video streams, bypassing the standard framebuffer for lower latency.
Key Benefits and Crucial Impact
The ability to screenshot a PC is more than a convenience—it’s a foundational tool for communication, documentation, and creative workflows. In professional settings, screenshots serve as visual evidence in support tickets, design references for developers, and training materials for onboarding new employees. For educators, they transform abstract concepts into tangible examples, while gamers use them to share achievements or debug in-game issues. The impact extends to accessibility; features like delayed captures help users with motor impairments, and OCR-enabled screenshots assist those who rely on text-to-speech tools. Without these capabilities, many digital interactions would require cumbersome explanations or physical demonstrations.The efficiency gains are equally significant. A well-timed screenshot can resolve a customer service query in seconds, whereas a verbal description might take minutes—and still fail to convey the issue. In software development, automated screenshot testing ensures UI consistency across devices, while designers use annotated screenshots to gather feedback without lengthy meetings. Even in personal contexts, screenshots act as a digital scrapbook, preserving moments from video calls, gaming sessions, or online research. The ripple effects of this functionality touch nearly every aspect of modern computing, yet its simplicity often overshadows its transformative potential.
"A picture is worth a thousand words, but a screenshot is worth a thousand solutions." — Tech Support Proverb (Attributed to early IT forums)
Major Advantages
- Instant Documentation: Capture errors, configurations, or processes in real time without relying on memory or manual notes. Ideal for troubleshooting or creating step-by-step guides.
- Cross-Platform Sharing: Native tools support direct sharing to cloud services (e.g., OneDrive, iCloud) or messaging apps, eliminating the need for third-party uploads.
- Annotation and Editing: Modern screenshot utilities include drawing tools, text boxes, and blur effects to highlight specific areas or redact sensitive information.
- Automation and Integration: Tools like Snagit or Lightshot allow batch processing, scheduled captures, and integration with project management software (e.g., Trello, Jira).
- Hardware Independence: Unlike mobile devices, PC screenshots can capture high-resolution displays, multi-monitor setups, and even virtual machines without quality loss.

Comparative Analysis
| Method | Pros and Cons |
|---|---|
| Native OS Tools (Win: PrtScn, Mac: Cmd+Shift+4) | Pros: Zero setup, keyboard-driven, supports basic editing (macOS). Cons: Limited to simple captures; no advanced features like scrolling windows. |
| Third-Party Software (Snagit, Greenshot) | Pros: Advanced features (scrolling captures, cloud uploads), customizable hotkeys, and batch processing. Cons: Requires installation; some tools have subscription models. |
| Hardware Buttons (Dedicated Keys, Capture Cards) | Pros: Instant capture with no software lag; useful for gaming/streaming. Cons: Limited to basic functions; hardware dependency. |
| Browser Extensions (Nimbus Screenshot, Lightshot) | Pros: Direct web page captures, easy sharing, and annotation tools. Cons: Browser-specific; may not work with all websites (e.g., DRM-protected content). |
Future Trends and Innovations
The next generation of screenshot tools is poised to blend AI augmentation with real-time collaboration. Expect to see features like automatic error detection in screenshots (e.g., flagging UI inconsistencies) and AI-generated summaries of captured content. For example, a screenshot of a code error could auto-populate a bug report with the line number and stack trace. Meanwhile, cloud-based screenshot editors will reduce local storage needs, offering collaborative annotation spaces where teams can comment directly on images, much like Google Docs for visuals.Hardware innovations will also play a role. Eye-tracking cameras could enable hands-free screenshot captures, while VR/AR integration will allow users to take screenshots of virtual environments with a glance. On the software side, blockchain-based timestamping may emerge to verify the authenticity of screenshots in legal or compliance contexts. As remote work and digital communication dominate, the line between static screenshots and interactive screen recordings will blur, with tools offering hybrid capabilities—capturing both images and short video clips in a single workflow.
Conclusion
The question how do you screenshot a PC has evolved from a niche technical curiosity into a cornerstone of digital communication. What began as a clunky workaround in the 1980s has become a suite of sophisticated tools tailored to every user’s needs—whether you’re a sysadmin documenting a server issue or a student sharing a lecture slide. The key to leveraging these tools effectively lies in understanding their strengths: native shortcuts for speed, third-party apps for depth, and hardware solutions for specialization. As technology advances, the focus will shift from how to capture a screenshot to what you do with it—transforming static images into dynamic, actionable assets.For most users, mastering the basics—like `Win+Shift+S` or `Cmd+Shift+4`—will suffice for 90% of use cases. But for those who demand more, exploring advanced tools and customization options can unlock new levels of productivity. The future of screenshot technology will likely prioritize context-aware captures, where the tool anticipates your needs (e.g., auto-capturing a full webpage when you select text). Until then, the principles remain the same: know your OS, experiment with shortcuts, and don’t underestimate the power of a well-timed screenshot.
Comprehensive FAQs
Q: Why doesn’t the `PrtScn` key work on my Windows PC?
The `PrtScn` key may be disabled in BIOS/UEFI settings, or your keyboard might lack a dedicated print screen button (common in ultrabooks). Try `Fn+PrtScn` or check your keyboard’s function layer. If it’s a software issue, ensure no third-party screenshot tools are interfering with system shortcuts.
Q: Can I screenshot a specific window without capturing the entire screen?
Yes. On Windows, use `Win+Shift+S` and select "Window" from the toolbar. On macOS, press `Cmd+Shift+4`, then press the Spacebar to switch to a camera icon and click the target window. Third-party tools like Snagit offer even more precise window selection.
Q: How do I screenshot on a PC without a `PrtScn` key?
Use alternative shortcuts: Windows: `Win+Shift+S` (Windows 10/11). macOS: `Cmd+Shift+3` (full screen) or `Cmd+Shift+4` (region). For laptops without dedicated keys, check if `Fn` + another key (e.g., `Fn+F12`) triggers the screenshot function.
Q: Are there screenshot tools that capture scrolling webpages?
Yes. Tools like Snagit, Lightshot, and Greenshot support scrolling window captures. In browsers, extensions like Nimbus Screenshot can capture entire pages. For manual methods, use `Win+Shift+S` (Windows) to capture a region, then scroll and take additional screenshots to stitch together.
Q: How can I edit a screenshot after taking it?
Native tools offer basic editing: Windows’ Snipping Tool includes a pencil and highlighter, while macOS’s screenshot utility allows annotations via the preview window. For advanced editing, use third-party apps like Paint 3D, GIMP, or Adobe Photoshop. Cloud-based tools like Google Keep or OneNote also support drawing on screenshots.
Q: Can I set up custom hotkeys for screenshots?
Yes. On Windows, use AutoHotkey to remap keys. On macOS, go to System Preferences > Keyboard > Shortcuts > Screenshots to customize existing shortcuts. Third-party tools like Snagit or Greenshot allow you to assign custom hotkeys for specific capture modes.
Q: Why does my screenshot look blurry or pixelated?
This usually occurs when the capture resolution doesn’t match your display settings. Ensure your monitor is set to the correct scaling (e.g., 100% in Windows Display Settings). For high-DPI screens, use tools like Snagit or ShareX, which support lossless scaling. Avoid JPEG compression if saving for editing.
Q: How do I screenshot a game without alt-tabbing out?
Use OBS Studio (free) to record a short clip, then extract a frame. For instant captures, try Dxtory or Fraps (gaming-specific tools). On consoles, use the built-in screenshot button (e.g., Xbox’s `Share` button). Avoid `PrtScn` in fullscreen games—it may freeze or glitch.
Q: Can I automate screenshots on a schedule?
Yes. Use Windows Task Scheduler with the `snippingtool.exe` command or macOS’s Automator to trigger screenshots at set intervals. Third-party tools like ShareX (Windows) or Hammerspoon (macOS) offer scripting capabilities for advanced automation.
Q: Are there screenshot tools that work across multiple monitors?
Native tools handle multi-monitor setups: Windows: `Win+Shift+S` captures across all displays. macOS: `Cmd+Shift+3` saves a combined screenshot of all screens. For advanced features (e.g., stitching), use Snagit or Greenshot, which detect and align multiple monitors automatically.
Q: How do I screenshot a password field without showing the text?
Use the blur tool in your screenshot editor (e.g., Snipping Tool’s pencil tool to draw over sensitive areas). For automation, tools like AutoHotkey can detect password fields and obscure them pre-capture. Always redact or avoid capturing passwords entirely for security.
Leave a Comment
Comments are moderated before appearing. The data you submit is processed according to the Privacy Policy of Viralcontentbee.