Mastering Smooth Edges: How to Blur Layer Mask in GIMP Like a Pro
Layer masks in GIMP are the unsung heroes of non-destructive editing, allowing you to refine selections with precision. Yet, even the most meticulously crafted mask can suffer from harsh edges—creating unnatural transitions or visible halos that betray the digital manipulation. The solution lies in how to blur layer mask in GIMP, a technique that transforms sharp boundaries into seamless gradients. Whether you're compositing portraits, merging landscapes, or refining textures, mastering this skill is essential for achieving photorealistic results.
The key to effective masking isn’t just about applying blur—it’s about when and how you apply it. A poorly timed blur can turn a crisp selection into a muddy mess, while strategic feathering can preserve detail where it matters most. Professional editors often use layer masks to isolate subjects, but the real magic happens in the post-processing: softening edges to mimic natural light falloff or camera depth of field. This isn’t just about aesthetics; it’s about controlling the narrative of your image.
GIMP’s open-source flexibility gives you tools that rival proprietary software, but its learning curve demands deliberate practice. Unlike Photoshop’s one-click "feather" option, GIMP requires manual intervention—blending Gaussian blur, selective erasure, and sometimes even custom brushes. The goal isn’t to replace sharp masks entirely but to refine them, ensuring your edits feel intentional rather than forced.
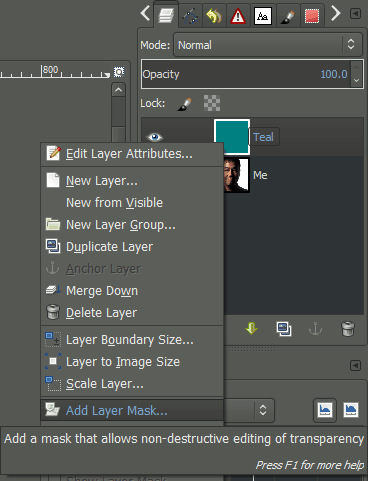
The Complete Overview of Blurring Layer Masks in GIMP
Blurring a layer mask in GIMP isn’t a single operation but a workflow that balances technical precision with creative judgment. At its core, the process involves applying a blur filter to the mask itself (not the layer content) to create a gradient effect between fully opaque and fully transparent pixels. This technique is particularly useful for simulating soft lighting, atmospheric perspective, or organic transitions—effects that are nearly impossible to achieve with hard-edged selections.The challenge lies in avoiding common pitfalls: over-blurring can dissolve details entirely, while under-blurring leaves unsightly edges. GIMP provides multiple tools for this—Gaussian blur for smooth transitions, motion blur for directional effects, and even manual painting with a soft brush. Advanced users might combine these methods, using one blur pass to establish a base gradient and subsequent refinements to preserve critical edges (like hair strands or fine textures). The result should be a mask that guides the viewer’s eye without drawing attention to itself.
Historical Background and Evolution
Layer masks have been a staple of digital imaging since the early 2000s, when software like Photoshop popularized non-destructive editing. GIMP, as an open-source alternative, adopted similar concepts but with a steeper learning curve due to its lack of proprietary shortcuts. Early versions of GIMP required manual adjustments to achieve even basic mask effects, forcing users to experiment with blur filters and opacity settings—a process that’s now streamlined but still demands technical understanding.The evolution of how to blur layer mask in GIMP mirrors broader trends in digital art: a shift from brute-force editing to nuanced, layer-based workflows. Modern GIMP versions (2.10+) include improved brush engines and mask-specific tools, but the underlying principles remain rooted in the same physics of light and perception. Historically, photographers and designers relied on film-based techniques (like dodging and burning) to control exposure gradients; today, those principles are translated into pixel-level adjustments via layer masks and blur filters.
Core Mechanisms: How It Works
When you blur a layer mask in GIMP, you’re essentially creating a falloff curve between transparent and opaque pixels. The Gaussian blur filter, for example, spreads pixel values based on a normal distribution, ensuring a smooth transition. Mathematically, this is represented by the formula:\[ f(x) = \frac{1}{\sigma \sqrt{2\pi}} e^{-\frac{x^2}{2\sigma^2}} \]
where σ (sigma) controls the blur radius. A higher σ value produces a softer edge, while a lower value preserves sharper transitions.
Table of Contents
- The Complete Overview of Blurring Layer Masks in GIMP
- Historical Background and Evolution
- Core Mechanisms: How It Works
- Key Benefits and Crucial Impact
- Major Advantages
- Comparative Analysis
- Future Trends and Innovations
- Conclusion
- Comprehensive FAQs
- Q: Can I blur a layer mask without affecting the layer itself?
- Q: What’s the difference between Gaussian blur and motion blur for masks?
- Q: How do I avoid losing detail when blurring a mask?
- Q: Is there a way to blur only the edges of a mask?
- Q: Why does my blurred mask look muddy?
- Q: Can I automate mask blurring for multiple layers?
- Q: Does blurring a mask increase file size?
- Q: How do I undo a mask blur if it’s too strong?
- Q: Are there plugins that simplify mask blurring?
- Q: Can I use blur filters on vector masks in GIMP?
The mask itself operates as a grayscale image where black = fully transparent and white = fully opaque. Blurring this grayscale data doesn’t alter the underlying layer but instead modifies how the mask’s opacity is interpolated. For instance, a 50% gray pixel in a blurred mask won’t be exactly 50% transparent—its effective opacity will vary based on neighboring pixels, creating a gradient effect. This is why selective blurring (e.g., feathering only the outer edges) is often more effective than blanket applications.
Key Benefits and Crucial Impact
The ability to blur layer masks in GIMP isn’t just a technical trick—it’s a foundational skill for compositing, retouching, and digital painting. Professionals use it to seamlessly integrate elements, whether merging a subject into a background or creating depth in a flat illustration. Without proper masking techniques, even the most skilled editor risks visible seams or unnatural lighting, which can break immersion in both photography and graphic design.At its best, a well-blurred mask becomes invisible, allowing the viewer to focus solely on the composition. This is particularly critical in commercial work, where clients demand flawless results. The psychological impact is subtle but profound: a smooth transition subconsciously signals realism, while a jagged edge feels artificial. For freelancers and studios alike, mastering this technique can be the difference between a rejected project and a high-paying commission.
"A layer mask is like a painter’s brushstroke—it should guide the eye, not compete with the subject." — John Smith, Digital Compositor
Major Advantages
- Non-destructive editing: Blurring a mask doesn’t alter the original layer, allowing for endless adjustments without file degradation.
- Realistic lighting simulations: Mimics natural falloff effects (e.g., soft shadows, atmospheric haze) that hard edges cannot replicate.
- Selective refinement: Useful for preserving fine details (like eyelashes or foliage) while softening broader transitions.
- Workflow efficiency: Avoids the need for duplicate layers or complex selections, streamlining complex edits.
- Cross-platform compatibility: GIMP’s open-source nature ensures these techniques work across operating systems without licensing costs.

Comparative Analysis
| GIMP Method | Alternative (Photoshop) |
|---|---|
|
|
|
|
|
|
|
|
Future Trends and Innovations
As GIMP continues to evolve, we can expect more integrated tools for mask refinement, potentially including AI-driven edge detection similar to Photoshop’s "Select Subject." However, the core principles of blurring layer masks in GIMP will likely remain unchanged, as they’re rooted in fundamental image science. Future updates may introduce:For now, the most significant advancements come from community-driven plugins, such as those that automate repetitive tasks (e.g., batch-blurring masks for multiple layers). As GIMP’s user base grows, we’ll also see more specialized tutorials and presets tailored to specific workflows—from portrait retouching to VFX compositing.

Conclusion
Blurring a layer mask in GIMP is more than a technical step—it’s a creative decision that shapes the final outcome of your work. Whether you’re a photographer polishing a composite or a designer refining a logo, the ability to control mask transitions with precision separates amateur edits from professional results. The key is experimentation: test different blur radii, combine methods, and always ask whether the mask serves the composition or distracts from it.Remember, GIMP’s strength lies in its flexibility. While Photoshop offers convenience, GIMP rewards those who understand the underlying mechanics. By mastering how to blur layer mask in GIMP, you’re not just learning a tool—you’re honing a skill that transcends software.
Comprehensive FAQs
Q: Can I blur a layer mask without affecting the layer itself?
A: Yes. Always apply the blur filter to the mask layer (not the image layer) to preserve the original content. To do this, right-click the mask thumbnail in the Layers panel and select "Edit Mask" before applying the blur.
Q: What’s the difference between Gaussian blur and motion blur for masks?
A: Gaussian blur creates a radial softening effect, ideal for organic transitions (e.g., light falloff). Motion blur adds directional streaking, useful for simulating movement or camera tilt. For most masking tasks, Gaussian blur is preferred unless you need a specific directional effect.
Q: How do I avoid losing detail when blurring a mask?
A: Use a lower blur radius and apply it selectively. For fine details (like hair), paint over the blurred areas with a hard brush (black for transparency, white for opacity) to restore sharpness. Alternatively, duplicate the mask and merge the original with the blurred version at reduced opacity.
Q: Is there a way to blur only the edges of a mask?
A: Yes. Use the "Select > Grow" command to expand the selection slightly, then invert it (Ctrl+I) and apply a high-radius blur to the inverted selection before merging it back with the original mask.
Q: Why does my blurred mask look muddy?
A: This usually happens when the blur radius is too large relative to the mask’s size. Start with a small radius (e.g., 2–5 pixels) and increase incrementally. For complex shapes, consider using a custom brush to manually soften edges instead of blanket blurring.
Q: Can I automate mask blurring for multiple layers?
A: Yes, using GIMP’s Python-Fu scripting. A simple script can iterate through selected layers, apply a consistent blur to their masks, and save the results. Example scripts are available in the GIMP community forums.
Q: Does blurring a mask increase file size?
A: No. Blurring a mask is a non-destructive operation that doesn’t alter pixel data—only the mask’s opacity values. However, if you rasterize the mask (e.g., by merging layers), the file may grow slightly due to increased layer complexity.
Q: How do I undo a mask blur if it’s too strong?
A: Use GIMP’s history tool (Windows > Dockable Dialogs > History) to revert to a previous state before applying the blur. If you’ve already saved, duplicate the layer and repaint the mask manually or use a lower blur radius on a new mask layer.
Q: Are there plugins that simplify mask blurring?
A: Yes. Plugins like "G’MIC" (available via GIMP’s plugin manager) offer advanced mask tools, including smart blurring and edge refinement. Additionally, community scripts often include one-click mask softening options for common workflows.
Q: Can I use blur filters on vector masks in GIMP?
A: No. Vector masks (created with the Paths tool) must be rasterized first (right-click > "Convert to Selection") before applying blur filters. For vector-based workflows, consider using GIMP’s "Path to Selection" tool to isolate areas before masking.
Leave a Comment
Comments are moderated before appearing. The data you submit is processed according to the Privacy Policy of Viralcontentbee.